


 Workouts

Instructions: Closing your Folding Rebounder
Opening and closing your Needak rebounder is a quick and easy process - just do it carefully!
 Please ensure you read all the steps and thoroughly understand the instructions before you begin folding your rebounder. Note that the spring cover should be removed prior to folding or un-folding your rebounder.
(Video on bottom of page)
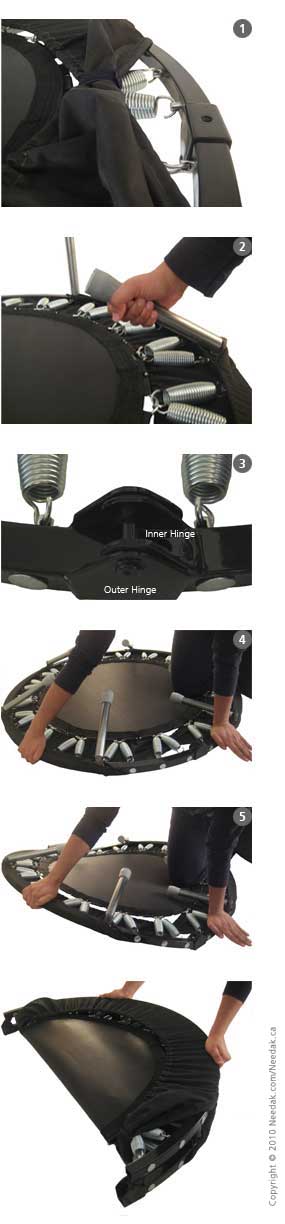
1) Protect your spring cover:
When closing or opening your rebounder, ensure that your spring cover is removed to avoid it being caught in the hinges.
2) Fold your rebounder legs:
Turn your rebounder upside down. With the rebounder lying flat, pull each leg up and over the platform pin and lay it towards the center of the mat. Extend the leg spring only enough to allow the leg tube to slip up and over the platform pin.
3) Identify the outer and inner hinges:
Your rebounder's hinge has two main part: the outer hinge and the inner hinge. The outer hinge is the large metal piece which surrounds the steel frame of your rebounder. The inner hinge is the smaller hinge and it lies inside the outer hinge. The inner hinge is the part of the hinge that will move when you fold your rebounder. It is important to differentiate between the outer and inner hinge before folding your rebounder. A simple way of differentiating is remembering that the inner hinge sits inside the outer hinge.
4) Position yourself:
Place the upside down rebounder in front of you so that the two outer hinges are closest to you. This half of your rebounder frame which the outer hinges are attached to is the bottom half of your rebounder. Place one knee with half your body weight over the edge of the bottom half and onto a portion of the mat and frame of your rebounder. Use one hand to aid your knee in holding the rebounder frame down against the ground. Ensure that your fingers are positioned away from the rebounder and away from the hinges. With your other hand, hold the edge of the rebounder frame that is furthest away from you. If your own body weight is insufficient or you find this position difficult, use furniture to hold the edge down.
5) Fold your rebounder:
In a slow and steady manner, pull the rebounder frame furthest from you towards you whilst keeping your weight on the bottom half of the rebounder. Make sure you grasp the frame firmly and maintain full control as you pull slowly forcing the hinges to fold. Once the rebounder has folded to a 90 degree angle you can begin shifting your body weight back and slowly move your knee off the rebounder as you bring it to a complete fold. For safety reasons, it is important to always be aware of your hands and fingers and keep them away from the hinges. Once folded, you may place your folded rebounder inside your Needak carry case.
Disclaimer: Please note that all the instructions provided on Needak.com are for informational purposes only and serve only as recommendations. Any use of these instructions or images is done at your own risk, and you defend, indemnify, and hold harmless Needak.com from any responsibility towards damages caused to you or any third parties as a result of your viewing or use of the information found on these pages. It is recommended you take all necessary precautions and familiarize yourself with the task you are attempting independent of the instructions on these pages.
 Please ensure you read all the steps and thoroughly understand the instructions before you begin folding your rebounder. Note that the spring cover should be removed prior to folding or un-folding your rebounder.
(Video on bottom of page)
1) Identify the hinges:
Your rebounders hinge has two main part: the outer hinge and the inner hinge. The outer hinge is the large metal piece which surrounds the steel frame of your rebounder. The inner hinge is the smaller hinge and it lies inside the outer hinge. The inner hinge is the part of the hinge that will move when you open your rebounder. It is important to differentiate between the outer and inner hinge before opening your rebounder. A simple way of differentiating is remembering that the inner hinge sits inside the outer hinge. The half of your rebounder frame which the outer hinges are attached to is the bottom half of your rebounder. Lay your rebounder on the ground so that the outer hinge side (the bottom half) of your rebounder is against the ground.
2) Position yourself:
Kneel in front of the curved edge of your rebounder. Place one hand firmly against frame of the bottom half of you rebounder - your hand should be partially in-between the top and bottom halves of your rebounder's frame. Using your other hand, firmly grasp the frame of the top half of your rebounder. Ensure that your hands and fingers are away from the rebounder hinges. If your own body weight is insufficient or you find this position difficult, use furniture to hold the edge down.
3) Open your rebounder:
Begin opening your rebounder by slowly and firmly lifting then pushing the top of the top of your rebounder away from you. As the rebounder begins to open up, slide one knee on the bottom half of your rebounder to provide more leverage and support whilst you complete opening your rebounder. Do not let go of the rebounder until it is completely open and both the top and bottom sides are laying completely flat against the ground. For safety reasons, it is important to always be aware of your hands and fingers and keep them away from the hinges.
4) Identify the platform pins on your rebounder:
There are six platform pins, one for each leg of your rebounder. Each platform pin protrudes out from the frame of your rebounder and has a spring connecting it to its corresponding leg.
5) Position your rebounder legs:
With the rebounder now open and still upside down, lift each leg into a perpendicular position, up and over it's platform pin. Ensure that you do this slowly and do not let go of the legs until they are properly in position. As you position each leg, move the spring cover and the bungee cord of the spring cover away from the leg tube and make sure that they do not get caught in-between the leg and the platform pin.
Disclaimer: Please note that all the instructions provided on Needak.com are for informational purposes only and serve only as recommendations. Any use of these instructions or images is done at your own risk, and you defend, indemnify, and hold harmless Needak.com from any responsibility towards damages caused to you or any third parties as a result of your viewing or use of the information found on these pages. It is recommended you take all necessary precautions and familiarize yourself with the task you are attempting independent of the instructions on these pages.
 Please ensure you read all the steps and thoroughly understand the instructions before you begin to remove any springs from your rebounder.
Tools required:
1 x long screwdriver
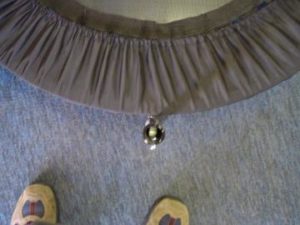
1) Remove the spring cover:
Once you have removed the spring cover, reposition your rebounder legs and turn your rebounder right side up.
2) Hook the spring:
Insert the long screwdriver into the hook of the spring on the side that is attached to the mat cleat. The mat cleat is the U-shaped steel connected to the mat of your rebounder. The sharp end of your screwdriver should be pointed towards the frame of your rebounder and the handle of screwdriver should be towards the rebounder mat.
3) Turn the screwdriver:
Keeping the screwdriver relatively parallel to the floor, slowly bring the handle of the screwdriver towards the frame of the rebounder. As you do this, the spring hook will begin to lift up and away from the mat cleat. As you keep turning the screwdriver, the spring will suddenly disconnect from the mat cleat. The sudden action of this disconnection causes a clacking of the rebounder spring against the metal of the mat cleat and screwdriver. It is important to be aware and expect this quick and sudden event to ensure you are not startled by it.
4) Complete removal:
Remove the screwdriver. Use your hand to remove the spring hook that is still connected to the frame of your rebounder.
For more information and a video guide, visit Needak Manufacturing directly at: https://needakrebounders.com/how-to-remove-your-springs/
Disclaimer: Please note that all the instructions provided on Needak.com are for informational purposes only and serve only as recommendations. Any use of these instructions or images is done at your own risk, and you defend, indemnify, and hold harmless Needak.com from any responsibility towards damages caused to you or any third parties as a result of your viewing or use of the information found on these pages. It is recommended you take all necessary precautions and familiarize yourself with the task you are attempting independent of the instructions on these pages.
 Please ensure you read all the steps and thoroughly understand the instructions before you begin to replace any springs of your rebounder.
(Video on bottom of page)
Tools required:
1 x long screwdriver
1) Remove the old spring:
Remove your old rebounder spring(s) by following the instructions on the Mat Spring Removal page.
2) Attach spring to frame:
Using your hands, attach the hook on one end of the spring to the frame of your rebounder. The spring attaches to the frame of your rebounder through the hole of the clevis pin. The clevis pin is a small metal piece that connects the spring to the frame of your rebounder.
3) Hook the spring:
Insert the long screwdriver into the free hook of the spring. The sharp end of your screwdriver should be pointed towards the inside of your rebounder.
4) Position the screwdriver:
Carefully insert the sharp end of the screwdriver down into the space between the mat cleat and the mat of your rebounder. The mat cleat is the U-shaped steel connected to the mat of your rebounder. The sharp end of the screwdriver should now be underneath the mat of the rebounder and the handle of screwdriver should be close to the rebounder frame.
5) Attach spring to mat cleat:
Slowly and carefully lift the handle of the screwdriver up and over towards the rebounder mat. Make sure the sharp end of the screwdriver remains below the rebounder mat. As you lift screwdriver the spring hook will slide over the mat cleat and become hooked onto it. Once this is done carefully slide the screwdriver away from the spring and mat cleat.
Disclaimer: Please note that all the instructions provided on Needak.com are for informational purposes only and serve only as recommendations. Any use of these instructions or images is done at your own risk, and you defend, indemnify, and hold harmless Needak.com from any responsibility towards damages caused to you or any third parties as a result of your viewing or use of the information found on these pages. It is recommended you take all necessary precautions and familiarize yourself with the task you are attempting independent of the instructions on these pages.
Please ensure you read all the steps and thoroughly understand the instructions before you begin to install your stabilizing bar on your rebounder.
Tools required: 1 x long screwdriver
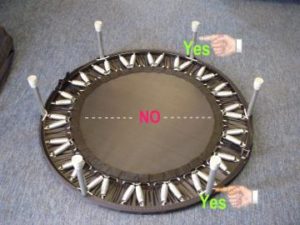
1) Choose two legs:
Place your rebounder, unfolded, on its back, with the legs pointed upwards. Choose any two legs separated by one leg.
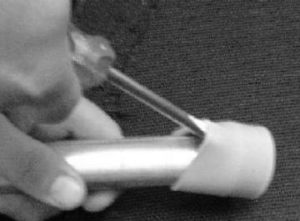
2) Remove rubber leg tips from chosen legs:
Remove rubber leg tips from two legs of the rebounder. Tips may be removed by cradling the leg in your fingers and pushing them off with your thumbs or with a screwdriver as shown. (Do not slip with the screwdriver or you may injure yourself or damage the jump mat). Tip: Apply petroleum jelly to the inside of the leg tips for easier replacement.
3) Attach sleeve to legs:
Slide the vertical bar/sleeve over the rebounder legs and replace the leg tips.
4) Position spring buttons:
Position bar legs so the spring buttons are pointing away from the rebounder frame. Note: During shipment, the spring buttons may slide away from the hole. Use a needle nose pliers to retrieve the button and reposition.
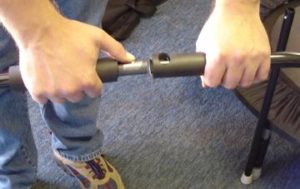
5) Assemble the bar:
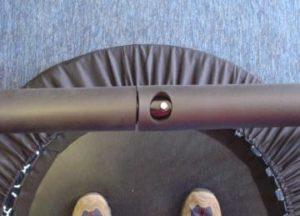
Connect the two curved pieces that form the top of the stabilizing bar. Both pieces have a series of 3 holes which indicate the bottom of the bar. These are adjustment holes to set the height of the bar. Looking to the other end of the curved pieces you will see that one of the pieces has a spring button. The other has a single hole. Depress the spring button and push the two pieces together while twisting slightly until the button and hole match. The snap button should pop up through the hole uniting the two pieces.
6) Determine the front:
You next need to determine the "front" of the stabilizing bar. When standing on the floor in front of the rebounder, the spring button will be to the left of the joint where the two halves meet. (When standing on the rebounder it will logically be on your right.)
And now your stabilizing bar is ready! Remember that it is not made to carry weight, but rather be used as a guide for stabilization.
For more information and a video guide, visit Needak Manufacturing directly at: https://needakrebounders.com/how-to-assemble-your-stabilizing-bar/Disclaimer: Please note that all the instructions provided on Needak.com are for informational purposes only and serve only as recommendations. Any use of these instructions or images is done at your own risk, and you defend, indemnify, and hold harmless Needak.com from any responsibility towards damages caused to you or any third parties as a result of your viewing or use of the information found on these pages. It is recommended you take all necessary precautions and familiarize yourself with the task you are attempting independent of the instructions on these pages.